bookmark_borderQuick Roof Repair

FAQS About Storm Damage Roof Repair

Protecting the structural integrity of your roofing system should be a top priority, as it is one of the most important aspects of any fundamental home maintenance and repair agenda. As soon as your roof begins to show signs of damage or reduced performance, it is wise to contact a licensed roofing company who can locate the source of the damage and make any professional repairs or adjustments as needed. The sooner you catch a roof problem and deal with it, the less costly and invasive the repair process will be. This includes professional post-storm inspections to ensure your property is still intact.

Since most homeowners are not roofing experts, it is common to have a lot of questions and concerns when it comes time to repair a roof. Continue below to read some frequently asked questions about roof repair and replacement to gain a better understanding of your roofing system’s needs after a harsh storm.

Will My Insurance Carrier Increase My Rates If I File A Roof Repair Claim?

It is common for insurance carriers to raise everyone’s rates across the board after a severe storm or natural disaster. One way to look at this is that you should file a claim for repair since you are already going to help pay for everyone else’s. It is possible that there are exceptions to this rule as well.

Why Is My New Roof Not Covered By The Manufacturer’s Warranty?

It is very common for roof product manufacturers to exclude hail repairs in their warranties. In fact, several warranties specifically name hail as a non-covered repair. Keep in mind that newer roofs are more prone to hail damage since they have not yet had ample time to cure and gain resistance against the natural elements. To avoid this problem, talk to a trusted contractor about the affordable hail damage protection options available to you.

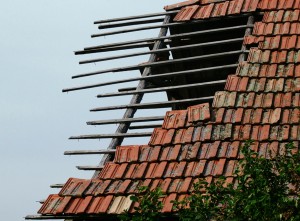
WHAT TO DO IF YOU SUSPECT THAT YOU MAY HAVE ROOF DAMAGE?

 If you suspect you have roof damage, you need to do the following:

1. Stay safe — avoid going on the roof to check for damage yourself and instead contact a professional roofer.
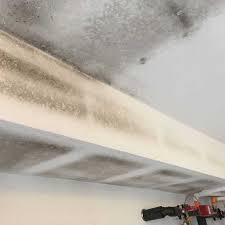
2. Inspect your attic for leaks or water damage. Also, if any water stains appear on your ceiling or walls, you likely need repairs or a roof replacement.
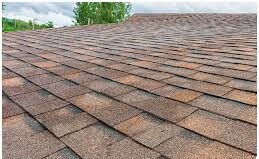
3. Look for signs of storm damage from the ground. Check for missing shingles or missing pieces of metal fascia, including any metal pieces displaced from around your chimney. Also, assess the condition of exhaust pipes, valleys, outer edges or angles where the roof meets the walls.
4. Obviously, you’ll notice if a tree fell on your roof. If so, stay out of your home until a professional can determine whether any structural damage occurred. Consider hiring a general contractor or roofer with a general contractor’s license if your home suffered structural damage, as you’ll need more than roof repairs.

I might have storm damage, where do I begin my reroof process?

The nature of the damage caused by storms can vary depending on the type of storm. Take a walk around the perimeter of your home and check for signs of damage. If you are unsure if your roof is damage, call a roofing professional. One thing to remember is before you start your insurance process, call Reliant Roofing to come and do a free inspection. We will perform a thorough inspection of the roof and we will let you know if you should pursue an insurance claim.

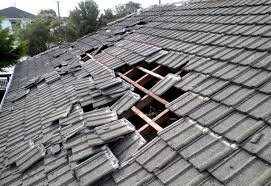
My neighborhood was just hit by a storm but my roof looks fine. Why do I need to have it checked?

Storm damage can be tough to see at times from the ground level. Your shingles may be pulling up and it not even be visible. Some leaks, especially in crickets or around flashing can go invisible to a homeowner for years. Unlike many types of roofing damage, hail damage is especially not always obvious, especially if you have a textured roofing material such as dimensional or architectural shingles. The outer roofing material may have shallow dents that aren’t readily visible. If these dents are deep enough to “bruise” the waterproofing layer, the smallest puncture could allow rainwater through the roof deck and into the attic, causing significant water damage.

Why can’t I inspect my own roof?

Many homeowners like the DIY aspect of some contract work. Roofing should not be one of the. Without proper safety gear and a trained eye, getting on a roof can be extremely dangerous, for you and your roof. While you may think you can save some money by going
this route, we highly discourage it. The majority of homeowners lack the safety knowledge and in-depth roofing expertise to perform the work properly and can easily make matters worse. Turn to an experienced professional like Reliant Roofing, who knows how
to conduct a roof inspection safely and thoroughly and can offer educated solutions.

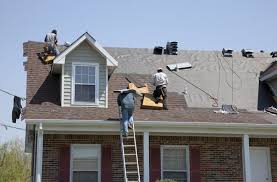
Do I need a roofing contractor involved in the process?

You do not have to have a roofing contractor to file a claim, however it is beneficial to have a trained contractor on site to meet with you adjuster so nothing is overlooked and you get a fair assessment of the damages.

How do I choose a contractor?

This is a very important question and decision.
Research the company. Check out the company website tomake sure they have a location within 50 miles or so of your property, and local landline phone numbers. Qualified contractors will also carry high levels of credentials will the three major material manufacturers (Owens Corning, GAF, CertainTeed).

You should find a contractor who is in accredited with the BBB and will readily supply you with insurance, workers compensation, references, etc. upon your request.

I have received my building estimate from my insurance company and I do not agree with the scope of work in the estimate and/or the adjuster’s assessment of damages. What should I do?

Just remember that during a catastrophe, an insurance adjuster can have as many as seven homes a day to inspect. Because there is a higher volume of claims than usual, adjusters may miss things. Our representatives take the necessary time to give you an accurate assessment of the scope of damages.

To make a fair and accurate evaluation, we use Xactimate, the software that all major insurance companies use. This ensures that you will receive the maximum amount of indemnifications allowed bwind damage missing shingley your policy. If there are discrepancies between our estimate and that of your insurance company, your representative will assist you in requesting a re-inspection or in sending your insurance company a supplement letter with evidence of additional damages

 Why is my mortgage company included on my check?

As a lien holder, your mortgage company has a vested interest in confirming that your property has been repaired and they often call for an inspection after the repairs are completed.

bookmark_borderFactors To Consider Before Purchasing Kitchen Faucet

How to Reset a Faucet

Automatic faucets have made their way into the home. You can add a touch sensor or motion-activated faucet anywhere a regular faucet is used. These faucets are handy because they don’t require turning a handle to get access to water. For any number of reasons, the faucet may quit working. When the touch-sensor or motion-activated faucet quits working, the first place to check is the battery compartment. Replace batteries as needed. After replacing the batteries, the faucet make require a reset to work.

Locate the battery compartment under the sink and remove the dead batteries. Some automatic faucets have a red light-emitting diode that flashes when batteries are getting low. The light is found near or on the battery compartment.

Open the battery case and realign the batteries with the positive and negative poles in the right positions according to the layout in the battery compartment. Close the battery compartment. Make sure it locks completely before continuing.

Locate the reset button, if any, on or near the battery compartment, after changing out batteries.

Push the red reset button to reset the faucet.

Test the faucet to ensure the reset corrected the problem.

Tip

Not all automatic faucets have red reset buttons. Some faucets just require inserting new batteries or realigning the batteries in the compartment to complete a reset. on the faucet. Check the instructions that came with your automatic faucet or locate the user’s guide online at the manufacturer’s website.

Kitchen area Faucet Mend – No Much more ‘Sob’ Operas

Exhausted from all that cooking, its time for you to hit the sack. But you will find some thing in your kitchen area that’s certain to place your splendor snooze in mortal jeopardy. Is it that creaky kitchen area cabinet that you choose to vowed to established proper when undertaking the next transforming task? No, truly it’s a thing more innocuous. It can be the kitchen’s leaky faucet that appears to have launched into a singular mission of decimating all your comfort. Take it easy, you will find a perfectly pragmatic option in sight for this ubiquitous difficulty. Kitchen area faucet restore, the same as kitchen faucet set up, could seem incredibly difficult, even so the point on the make a difference is it truly is kid’s perform. Be it a bronze kitchen area faucet as well as a brass kitchen area faucet, you’re never ever far away through the remedy of the best way to restore a dripping kitchen faucet superior ball screw repair.

Know the system inside of out

Right before you can get to find out the intricacies of kitchen area faucet restore, it can be essential to familiarize on your own together with the doing work of a kitchen faucet. Kitchen taps are classified in to four various types- the cartridge kind, compression, ball and disc form. While the cartridge, ball and disc style of faucets have single handle control, the compression style of faucet is characterised by dual handles for both equally scorching and cold water. The truth is this sort of faucet is armed with washers and seals, some thing one other 3 absence. The existence of O-rings and neoprene seals ensure that you can find no leaks.

The reasons for those annoying leaks

Before undertaking any repair work, it’s important to diagnose the root cause of this galling problem. A faucet leak in the kitchen may be caused by worn out washers, seals or O rings. Even the presence of antiquated inlet and outlet seals may be the reason for the kitchen faucets not being up to snuff. Sediments in the inlet valve may lead to a leaky faucet.

Steps to fix that leaky faucet

Here are a few steps that are sure to put an end to this obnoxious problem:

* Firstly, turn off the hot and cold water valves. Loosen the screw at the base of the handle and remove the faucet.

* Make sure you line all the parts of the faucet in the order in which you remove them, so that putting them back does not seem to be like a jigsaw puzzle.

* Put a piece of tape around the plier to prevent any tell-tale signs of repair on the faucet.

* Remove all the inner parts by loosening the retaining nut.

* In case you find that the ball valve is damaged, replace it immediately.

* Replace all the springs and seals that are worn out.

* Remove all traces of sediments on the inner parts. Check for cracks on the O rings and gaskets.

How to fix a Ceramic disc faucets

Ceramic disc valves are simply another type of cartridge. Discs inside the cartridge control the water flow. This type of valve is sturdy and reliable and rarely needs fixing. In fact, many manufacturers offer a lifetime guarantee on the cartridge. If yours is damaged, check with the manufacturer to see if it’s covered by a warranty.

Leaks can result from faulty rubber seals or a cracked disc inside the cartridge. Since it’s difficult to spot a cracked disc, and disc cartridge replacements are very expensive, it’s best to start by replacing the seals and reassembling the faucet. Then if the faucet still leaks, remove the disc cartridge and take it to the store to order a replacement.

Early versions of ceramic disc faucets may be more fragile and can crack if subjected to a blast of pressurized air. That’s why it’s important to leave the faucet open as you turn the water back on. This allows air trapped in the lines to escape. When the water runs smoothly, it’s safe to turn the faucet off. Manufacturers have improved the strength of ceramic discs on newer faucets to withstand air blasts, as well as abrasive debris that may get dislodged from the inside of pipes.

Replacing the Faucet Valve Seat

In case the compression type of faucet is still leaking from its spout despite servicing the valve, then it’s possible that the faucet valve seat is nicked or cracked.

The faucet valve seat consists of a metallic component which is threaded and screwed into the valve base. You should use the seat type wrench to remove the faucet valve seat. This wrench resembles the taper hex type of wrench.

You’ll need to detach the valve once again. Then insert the wrench deep within the housing of the valve until it fills the hexagonally shaped hole.

Next, rotate the wrench in a counterclockwise direction to remove the valve seat. You’ll easily find replacements in your local hardware stores.

You can carry the old faucet valve seat with you when buying a replacement to ensure you purchase a matching replacement.

bookmark_borderAdvantages Of Using Photo Booth In Parties

Tips For Choosing A Photobooth For Your Event

When planning events, it’s so important to give your guests something memorable from the event. Albeit an experience or something they can take with them, the gesture goes a long way. If you choose to go with the option of hiring a photobooth for your event, you can offer your guests free prints of the photos they are taking.

Location Is Everything

If you’re booking your event venue knowing you’ll have a photo booth there, be sure to choose a venue that’ll be big enough for the booth to set up. If this is something you have decided after you have made a booking, the standard size of the booths are around 3m x 3m. This again will be dependent on the type of photo booth you select.

Choosing The Type Of Photo Booth

Thanks to the many technological advancements, the way we know photobooths have changed! As there is now a large variety of photo booths, the technology can be adapted to fit the shell of the photo booth.

Choosing Your Photo Booth Backdrop

Surprisingly enough, the backdrop is an important consideration to bare in mind when deciding on where you’ll be setting the photo booth up. You can choose if you want a backdrop with a custom background, an open air backdrop with the view in the background, or if you prefer the booth to be enclosed.

Will Guests Be Standing or Sitting

This links very closely to where you set up your photobooth and how much space is available. To ensure a much smoother transition between each picture, having your guests stand when they take their picture is recommended. You can give guests the option to sit just as long as they’re a smaller group, and are willing not to use as many props. That way you’ll avoid any sort of injury!

THE NEXT GENERATION OF PHOTO BOOTHS HAVE THEIR SIGHTS SET ON YOU

A machine named Queso wants me to pose like a spy. A short video shows three people making finger guns, backs against one another, and even though I feel awkward doing this alone in the middle of a Las Vegas convention show floor, I oblige. Next, Queso says to pretend like I’m thinking, and I’m beginning to understand why this photo booth was named after cheese. Finally, it tells me to jump around. I hop a few times until Queso floods me with light for the final time. Then I quickly gather my things and move behind the machine to retrieve a copy of my pictures.

But there is no printout — yet again. I came to the fifth annual Photo Booth Expo hoping to go home with a comically large pile of selfies, but none of the 40-something exhibiting photo booths have printed out anything. Instead, they’re offering to email or text links to the photos for easy online sharing

This is the state of photo booths in 2019. What was once on a highway to extinction has been reborn as an Instagram machine, transforming the humble self-portrait into theatrical displays for social media currency. While the machines pander to the young demographic that loves these experiences the most, they’re also monetizing a valuable asset in exchange: their data.

To photo booth operators, there are two types of customers, says Brandon Wong, founder of Photobooth Supply Co. (PBSCO). First, there is the birthday, wedding, and anniversary party crowd, which are the types of events that make people want to take home a souvenir. “Everyone’s already dressed up, looks great, and wants a fantastic picture to hang up,” Wong says.

The photo booth’s modern revival roots back to 2010, the same year that both the iPad and Instagram were born. Event photographers could now build smaller, cheaper photo booths that relied on the tablet and then email the photos to customers instead of having full-sized cameras and photochemical solutions. All the while, Instagram encouraged people to think of their online counterpart as a visual homepage that’s filled with unique photos that presented them as their most interesting, beautiful selves

Tips to Survive a DIY Photo Booth Experience

Most everyone has probably been to some type of event that had a photo booth set up for the guests.  Photo booths seem to have gained a lot in popularity, especially at weddings, but you may see them at birthday or retirement parties, or a variety of other gatherings.  They can be lots of fun and offer little pressure to those being photographed.  Even those who generally don’t like sitting in front of a camera will often break out of their shell, garner a few props, and take a few silly photos.  Not only is it a fun experience that will leave some fond memories, but the resulting photos can be a valuable keepsake for the guests who get involved as well as the event’s honorees.

Recently, I was asked if I could set up a photo booth at a big surprise going-away party.  This wasn’t a paid gig, but rather a favor for friends and something I wanted to try out.  After all, it’s just a matter of setting up a camera, a light or two, and letting people take pictures of themselves. Pretty simple, right?  Well, there is a bit more to it than that, so I took to the internet to learn what I could about setting up a photo booth.  What I found was information that was either over-simplified, using a point-and-shoot camera and maybe a flash, or a much more complicated system utilizing a full enclosure and lots of fancy (and expensive) gear that I don’t have.  I knew that there had to be something in between, that would provide some decent images with good lighting, without being overly complex and expensive to set up.  That’s what I set out to do and this article provides some of the things I learned along the way. Note that this article does not deal with the business side, such as how much to charge for your photo booth, insurance needs, or contracts, but rather the gear that is necessary and how to set it up.  So, let’s get started!

Scout the Location

As with most types of photography, but especially where portraits of people are involved, it’s a good idea to scout out the location of the shoot to get a ‘lay of the land’.  There are a few things to look for on these reconnaissance missions that will help you prepare your gear and to make sure you have everything you need when the shoot starts.  This will help to increase your confidence level and also help to remove some of the variables so that you can focus on providing the best experience possible.  For my particular experience, the event was being held in a location that I was familiar with, so I already had some idea of what to expect.  However, it was still a good idea to set up several hours in advance to determine the best layout for the photo booth in relation to how the venue was arranged and the activities that were going to take place.  Additionally, it is important to figure out the location of the nearest electrical outlets to plug in chargers, battery packs, lighting, or your laptop.  As they say, if you fail to prepare, then you prepare to fail.  So don’t skimp on this part

Safety First!

OK, so it is Tip #2, but safety should always be paramount, especially when we are photographing people, and particularly for a photo booth, because there is lots of activity, with people coming and going.  Be sure to eliminate or at least minimize any tripping hazards, such as cables, extension cords, tripod or light stand legs, etc.  If anything is left unsecured, there is a chance it could take a tumble if it gets bumped or someone catches a foot on it in all the excitement.  I learned this the hard way.  Within 10 minutes of opening my photo booth, one of my light stands ended up lying on the floor, mangling the brand new umbrella that was attached.  Thankfully, no one was hit and the umbrella was still functional after a little ‘persuasion’, but this could have been avoided. Since the light stand will be top-heavy, consider using sand bags to add some weight to the bottom.  If possible, even consider attaching the legs of the stands to the floor, possibly with duct tape. Make sure that all cables and cords are secured with cable ties and routed in areas where there will not be any foot traffic.  After setting up the photo booth, make a precursory run through it and check for anything that could be a potential problem and deal with it then.  Make sure to make getting in and out of the photo booth as easy as possible, with plenty of space between the flow of traffic and your gear

Establish Some Rules

This one kind of goes along with the previous tip.  A photo booth will generally consist of lots of photography gear, including your camera, tripod, and lighting setup.  People will be in and out of the photo booth all evening, so you want to be sure that equipment stays just as safe as the guests.  Unless you plan to closely monitor the photo booth (and even if you do), it’s a good idea to set some rules beforehand.  This is particularly applicable if there will be a lot of kids at the event.  In all of the busy-ness, it can be difficult to keep track of everything that is going on and what each person is doing.  It’s a good idea to ask that all children 10 years old and younger be accompanied by an adult.  We all know that kids can be quite curious and may wonder about what all those buttons on the camera do.  The last thing you would want is for a young bundle of energy to get up close and personal with your gear.

Why rent a photo booth

Having a photo booth at your event will be the ultimate hit and life of the party! Our photo booth provides a very unique and entertaining experience that everyone will enjoy from the moment they arrive. Just like many of our customers say “the least expensive and the best part of our event”.

What makes your Photobooth stand apart from your competitors?

We are Wedding and Events Photographers. As Photographers we want the best picture quality and prints coming out of our booths, we used top notch real professional Full Frame Cameras, not consumer cameras, real Professional grade lenses and lighting to insure the best picture possible. Also, our booths have video mode and is available in most of our packages. We also have a variety of Professional Modern Backgrounds for you to choose from. We do our best to make sure your photos leave a lasting impression. Oh and let’s not forget about our props! We have the most fun props and props/signs! That’s how we stand out of the competition.

How does it work?

Just get in, You will be in front of a large 21-23″ Screen with live view,  touch the screen to select Color or Black & White, Push Start for Photos smile and the booth will do the rest! Images will be displayed on the monitor inside the booth, 10 seconds later the pictures are printed and available outside the photo booth. (The options vary with the model of the booth.) Or Push Start Video wait for the countdown and start saying your Message when you see the green bar. An Attendant will always be on site to guide you through!

Can I view My photo before it prints??

Yes, there is an option that requires you to confirm the photos if you are happy you hit Print if not you hit Re-Take, it is convinient but is not recommended as it will slow the line. If it Prints Automatically it will have the line moving much faster.

How long does it take to get a photo printed?

It takes about 10 seconds for the photo to be processed and printed. It’s super fast!

Choose the Best Photo Booth for Your Event

Adding a few surprises to your event is a great way to help guests break the ice, loosen up and get into the spirit of the day or night, whatever your intended outcomes. An excellent choice is photo booths, and there lots of different ways you can use them to help everyone have fun

Your Venue

Choosing the right event products is about finding the best setup for the space you have, so look at your venue and party area before selecting a photo booth. If you have limited space, for example, many think that a photo booth isn’t an option at all. However, you could consider a social media pod where lack of space is an issue. This has the same effect as the magic selfie mirror but is more versatile because it doesn’t require as much room, is easier to use and no host is required, as well as being cheaper which is always a bonus

Your Event Purpose

The type of event you’re hosting should influence the types of product you select, helping you to meet the aims of the day or night and ensure everyone has a good time. You can even combine photo booths with props the reflect and enhance your event theme. If you’re planning a product launch or corporate event, for example, social media pods are a great way to spread brand awareness online. On the other hand, the most up to date photo booths will have in-built Green Screen technology to help you create different themes and backgrounds. Equally, if the purpose of the event is for having a good time and celebrating, such as a wedding or Christmas party, magic selfie mirrors are a really fun and interactive choice.

Your Guests

How much thought you put into the guest experience is something which is going to define how they remember your event, so choosing products based on the mixture of people you have coming is always a smart move. For example, if you have a diverse range of age groups attending (especially at weddings and family parties), a traditional photo booth is often the best choice as it means young guests can reach the camera and older generations may feel less shy when in an enclosed booth, helping to get everyone involved. However, magic selfie mirrors are perfect for full length and wider shots, which is great if you have a lot of people who’ll want to show off their outfits or larger groups are involved.

bookmark_borderWhen Do You Need An Electrical Upgrade

Is it Time for an Electrical Wiring Upgrade in Your Home?

While it may seem like a permanent component of your house, residential electrical wiring often has a finite lifespan. If you’ve purchased an older home or lived in your present residence long enough, the time eventually arrives when re-wiring the house may be necessary. Some of the reasons are related to the age of the electrical system and/or its original configuration. Others are simply a result of the changing times and higher demand. Here are some scenarios that may cause you to consult a qualified electrician about upgrading your electrical wiring.

Does the house have aluminum wiring? Abut 2 million houses built in the late 1960s and early 1970s do. Connections in aluminum wiring are known to be at high risk for failure. This could cause a dangerous fire or, at the very least, interrupt power to household circuits. Replacement with copper electrical wiring is indicated.

Are circuit breakers tripping? That can be a symptom of a system that’s not up to the task of providing enough electricity to meet current demand. The rapidly increasing number of electrical devices in today’s homes has made the old standard 60- or 100-amp systems increasingly obsolete. Today, new houses are typically constructed with wiring and panels rated for at least 150 amps. (Circuit breakers that repeatedly trip may also indicate a faulty appliance or dangerous shorts, so they should always be checked out by a qualified electrician immediately.)

Safety Issues with Older Wiring

Faulty wiring is the leading cause of residential fires, according to a 2009 study by the National Fire Prevention Association. And the older your house is, the greater the chances that the wiring might be outdated or unsafe.

Old wiring—even knob and tube wiring that dates back to the early 20th century—isn’t inherently dangerous, but unless you were around when the house was built, you can’t be sure the electrical system is up to code. Plus, materials such as wire insulation can deteriorate over time.

If you don’t know when your wiring was last inspected, it’s worth paying a licensed electrician to give it a once-over, especially if you have any of these warning signs:

  • Breakers that trip or fuses that blow repeatedly
  • A tingling sensation when you touch an appliance
  • Flickering or dimming lights
  • A persistent burning smell from a room or appliance
  • Warm, discolored, or sparking outlets
  • Two-prong ungrounded outlets throughout the house
  • No ground fault circuit interrupter (GFCI) outlets in kitchens, baths, and other areas exposed to moisture.

Another reason to consider upgrading is that some carriers refuse to insure houses with older wiring, or charge owners higher premiums

Signs You Need Electrical Updates

If you want to keep your home safe, you need to make sure your electrical panel is up to snuff.

You might be surprised to find how many common electrical issues can be traced back to a faulty electrical panel. Remember, your panel is linked to your entire electrical system, so if the panel is malfunctioning, the damage is more widespread than the basement or dining room.

Your Home Relies on Fuses and a Fuse Panel

Technically, there’s nothing wrong with fuses and fuse panels, per se. A fuse and a circuit breaker both protect an overloaded circuit by interrupting the flow of electricity, switching off the power before the circuit blows. The way they do it is very different. A fuse contains a piece of metal that melts when overheated, while a circuit breaker has an internal switch mechanism that cuts power when it senses an unsafe power surge. As we said, there’s nothing technically wrong with fuses and fuse panels. They’re common in older houses built before the 1960s. The problem is that, because it uses a melting piece of metal, they’re a major fire hazard.

Old or Faulty Wiring

If your electrical panel is up-to-date and your lights still dim and flicker, that’s a sign that your wires may be old. If you’re not sure whether your wires are old or faulty, there are a couple other red flags you can look for. A burning smell near electronics or appliances isn’t a ghost–it’s the scent of burning wiring. The same thing applies to a shock or tingling sensation when you touch an appliance. Sometimes it’s static electricity, but if it happens often, it’s probably not static. And if you see any discoloration near plugs, it’s time to switch off your power and call an electrician. Generally, if you live in an old house, it’s a good idea to get your wiring checked regularly–the house likely contains outdated wiring systems that may need to be replaced.

Your Circuit Breaker Often Trips

A circuit breaker should “trip” when it overloads—this is a safety feature that prevents hazards. But if your circuit breaker always trips, that’s a solid sign you need an electrical service upgrade. It means that the electrical panel can no longer handle your electricity requirements. This means you now have too many appliances that your breaker can handle. This forces the breaker to supply more electricity than its capacity. This can overheat its circuit, which can then fry up the circuits of all appliances connected to it.

Lights Keep Flickering or Usually Turns on and off

Do your house lights flicker when you power on your air conditioner? Perhaps they go on and off whenever you run any high-wattage appliance. Either way, this can mean that your electrical panel is already going beyond its capacity. This situation often precedes a constantly tripping circuit breaker. Upgrade the electrical panel now before it damages your appliances’ internal components.

The Electrical Panel Gets Warm or Emits a Burning Smell

The heat or burning smell can indicate severe overloading. These signs can also mean a failed circuit breaker or a disconnected wire. All these issues can trigger a house fire. Turn off the electrical panel as soon as you notice these signs. Then, have expert electrical service providers repair or replace your electrical panel.

Worn-Out Wiring

If the wiring in your building is more than 40 years old, chances are it won’t be able to meet your needs safely and efficiently, especially if it hasn’t been properly maintained.

Your electrical wiring could be unsafe if you notice:

  • Your lights flicker or dim frequently, particularly when a large appliance such as a refrigerator or A/C kicks on.
  • Equipment and appliances run slowly or can’t reach full power.
  • Breakers trip or fuses blow repeatedly.
  • You need extension cords to get power to all your equipment.
  • Your switch plates and outlets feel warm.
  • You feel a tingling when you touch a metal appliance. This means the appliance isn’t properly grounded and could cause electrocution.
  • Outlets are brown or melted.
  • Outlets spark or warm up when you plug something in.
  • Parts of the insulation around your wiring has melted.
  • You notice a burning or hot plastic smell in a certain room.

Some issues don’t pose an immediate threat, but should still be corrected to ensure the safety of your building’s occupants. Two-pronged, ungrounded outlets should ideally be replaced with three-pronged grounded outlets. If your kitchen, bathrooms, and other rooms with high moisture levels don’t have GFCI outlets, these should be installed. GFCI outlets have a “test” and “reset” button in the middle between the sockets. They can detect abnormal current flow, and prevent shorts and resulting electrical fires.

bookmark_borderThe Perfect Movers For Your Local Moving

Moving Long Distance vs Local – Long Distance Move Takes More Time

With more preparations in play, the time and effort required will skyrocket. It will not be anything that is not manageable, of course, but the process will tax you. Let’s say that you’ve done your scouting and you now know where your new home is. You need to hire a moving company next. And you need to hire them well in advance if you want more time to choose the best option. A couple of months before is a good time to consider hiring your movers.

Another Difference Between Moving Long Distance vs Local – Moving Costs

Now we come to the real difference. If you moved before in your life, you know how expensive it is. Regardless of the fact that you are doing a DIY move or hiring a professional moving company, the costs will be significant. That means that you need to form a moving budget. Long-distance moves will require a much bigger budget than the local moves will. You also need to consider your movers, as well. You want to have a reliable moving company as your partner, especially in the long-distance moves.

Factors to consider when planning your move

So what are the considerations you should make when determining whether your move is going to be a do-it-yourself job or one that you’ll leave professional movers to handle?

The following factors could sway your decision one way or the other.

Cost is more than money

When it comes to cost, it’s easy to conclude that a DIY move will be cheaper than hiring professionals. However, there are some things that money can’t buy. For example, in a DIY move, you’re in charge of the heavy lifting. You could damage or lose furniture or belongings that an experienced professional’s experience could have delivered unscathed or mover’s insurance would cover.

On the other end is the cost of time, physical effort, packing supplies and gas, risk of personal injury, and other considerations that might cost you money in the long run.

So, it’s important not to just think of costs in terms of dollar signs. That’s only half the picture.

Availability of time

How soon do you need to move? If your move is planned in advance, it’s much easier to make an informed decision about how you would manage a do-it-yourself move or pay for a professional service. This gives you the time to brainstorm with all of the people involved and gather the required resources. But if you have a tight schedule, you may discover that your circumstances make the decision for you.

Distance

Distance is an essential factor to consider when deciding which moving option you’ll go with. For instance, friends and family could help you move locally. But if you’re talking about a 500-mile move, that’s a bigger ask. You might have to call in the pros.

Also, your small van may be more suitable for carrying your stuff if you’re making trips to a place nearby than it would if you were attempting to make numerous hundred-mile trips.

Amount of stuff you are moving

If you’ve lived in the same house for a few years, it may not be easy to appreciate how much stuff you’ve accumulated until the day you have to pack it for a move. While you may want to choose to DIY, there are instances where you just have too much stuff to handle. A big move with lots of boxes and furniture might require the professionals.

On the other hand, if you’re moving out of a small apartment, planning to declutter, or have been living the minimalist lifestyle, a do-it-yourself move might be a good option.

Availability of helpers

They said they’d be there for you, come rain or shine. But things come up, and commitments wear off with time. When moving, getting help from your friends, family, or neighbors isn’t always a guarantee. If you can’t find enough people you can count on, the do-it-yourself option may be impractical.

Hiring Movers

Pros

  • You won’t have to lift a finger – Leave the heavy lifting to the professionals. After all, these trained movers were hired for a reason. By enlisting a reputable moving company, you won’t have to worry about lifting and carrying any of your heavy couches down the stairs and out the door. You also won’t have to worry about straining muscles, scratching up new floors or begging friends to help with the lifting. Instead you can focus on babysitting your children, watching your pet and other important tasks at hand. Or you can just kick back and relax.
  • Efficiency – Assuming that you’ve hired a legitimate and experienced moving company, I’d venture to say that your movers will be pretty reliable. Unlike friends who can flake, the moving company is under contract to assist with all agreed upon aspects of the move. The moving company should arrive on time with the appropriate moving supplies and equipment – saving you from the not-so-fun task of gathering dollies and furniture pads at the last minute. In the long run, hiring a reputable relocation company saves the customer a lot of moving hours.
  • Less stressful, overall – In general, hiring movers saves you from many of the common moving day stresses. In addition to a moving company’s time-saving benefits, hiring help will also save you from having to maneuver a giant moving truck down the highway. Moving trucks are notoriously tricky and challenging to drive. Trailers aren’t much easier either. If the idea of loading and driving a large moving truck stresses you out, then I highly recommend hiring movers to help.

Cons

  • Less flexibility – When you hire professional movers, you limit your own control over the move. From the date/time of pick-up to the manner in which the movers load your belongings, there’s not much you can do to change when and how you move. Worst case scenario: you could end up waiting weeks for your moving truck to arrive, if the relocation company has multiple stops along the way. For those who like to be in complete control, hiring a moving company may not be the best option for you.
  • Impersonal – Chances are, you don’t personally know your movers. Handing over your precious belongings to complete strangers can be a bit nerve-racking, to say the least. That’s why it’s so important to do your homework, read reviews and check ratings before enlisting a moving company to help you with your relocation. To avoid moving scams and rip-offs.

Why You Should Hire A Professional Mover

Whether it’s for residential or commercial needs, moving is one of these troublesome instances when experience and professional know how can mean the difference between a good  move and a bad move.  If you are planning to move, now or in the future, you might find yourself wondering “Should I hire a moving company or move by myself?”  When deciding on between a DYI Move or using professional movers, take the following instances into consideration:

Experience

Several indisputable facts show that hiring the services of a highly experienced professional moving company is your most beneficial option when moving across country:

Safety

Professional movers are trained to use the most appropriate and efficient moving techniques to ensure that your household items are properly packed, shipped safely and promptly delivered to your new home intact and unbroken.  The use of appropriate wrapping and padding prevents items from shifting inside the boxes during transport, careful maneuvering through narrow corridors and steep staircases, proper loading of items, securing all items in the moving truck and competent driving skills will account for the safety of your household items.

Know-How

Professional movers know their stuff!! They know how to properly handle heavy and bulky items, odd-shaped furniture and sensitive electronics, so all your belongings are efficiently and safely transferred to the moving truck and then into your new home. Additionally, movers know the shortest and safest to the final move destination, and are very familiar with the peculiarities of the local area which allows them to avoid any traffic or parking problems.

So, why should you hire a professional moving company? Because experience matters and results in safety, speed, reliability, efficiency and peace of mind.

Cost savings in the long run

The allegedly high cost of hiring movers can be a good reason to make you think twice before using the services of a professional moving company. However, contrary to popular belief, hiring movers may prove to be as economical, or even more so, as performing a DIY move.

Of course, there are plenty of factors that come into play when trying to determine the final relocation costs, such as moving budget, time, distance and complexity of the move. One common Do-It-Yourself mistake is to underestimate the cost of moving on your own, that is, without using a moving company.

Accountability

Keep in mind that one of the top reasons to hire professional movers is that the best movers in the country come properly insured, which means that the pros will be held accountable for any type of damage to your belongings.

If you’ve made up your mind to move without hiring the services of a professional mover, it’s important to understand that you cannot hold your friends responsible for accidentally damaging one or two of your things. After all, your pals are not professional movers, so they can’t possibly have the extensive training, experience, and expertise of the pro movers. If a friend of yours broke something expensive – accidentally, of course – all they could do is say they were sorry. And that would not be enough to console you in any way, would it?

Professional movers come adequately insured but you should still purchase additional coverage if you happen to be moving valuable items. If you choose to get Full Value Protection, your movers will be liable to compensate you with the full cash value for any damaged or missing items.

Thus said, you should never count on the Released Value Protection – the “coverage” that comes into effect when you sign the moving contract and that is offered for free. Why? It’s practically non-existent so treat it as such.

bookmark_borderKnow About Hiring Professional Post Construction Cleaning

What is post-construction cleaning?

Post-construction cleaning is done after remodelling, renovation, commercial construction or residential project to prepare the property for its new residents оr for further interior touches. Post-construction cleaning can be done for all kinds of buildings, such as restaurants, hotels, education, government and manufacturing facilities.

Post-construction cleaning is done by a team of professionals that carefully inspect the property and clear out anything left from the construction process. Here is a handy post-renovation cleaning checklist to help you sort through the mess and get your house looking great again. 

Why is post-construction cleaning important?

Post-construction cleaning is done mostly for safety. Construction dust contains toxins and carcinogens that can be dangerous to the new residents of the building.Also, there might be nails, sawdust and broken glass and other material leftovers waiting to poke someone’s feet. If you’re not well equipped, if you lack the knowledge and the experience needed, better don’t try to tackle this job alone. Being unaware of the risk and hazards from a poorly-handled construction cleanup can be very dangerous.

Relax in Your Renovated Home Faster with These Post Construction Cleaning Tips

Before you can relax in your newly redesigned home, there are some steps you need to take to finish off your remodel to perfection.

Remember: if you have sensitive lungs or respiratory problems, consider wearing a mask for the cleaning process. This will prevent you from discomfort caused by breathing in dust and chemicals.

1. Open the Windows

Even if it’s the middle of winter, open your windows. This will create an airflow to draw out dust, reduce smells from cleaning products, and minimize the strange odors of plaster dust and sawn wood.

2. Sweep First

It’s tempting to dust surfaces as the first step of cleaning, but don’t. Instead, sweep the floors first.

Sweeping often causes dust to settle on surfaces. Unless you want to get stuck in an endless cycle of dust, sweep, repeat, try sweeping first to minimize the additional dust clouds.

3. Dust Everything (We Mean It. Everything.)

Get out the microfiber cloths and wipe down everything in sight. Old rags won’t do the job properly: you want to use proper dusting cloths designed to attract dust particles.

Remember to clean between blinds, window ledges, the tops of door frames, shelving units, cupboards, and any other surface. Start in one corner of the room near the exit and work your way back around to the same doorway.

4. Leave the Room

You can put your feet up for a few minutes. Leave any dust particles that have been caught in the air to settle down again.

If you have other rooms that need cleaning, now’s the time to start sweeping and dusting. If your remodel was only for the one area, sit back and relax for half an hour.

5. Now It’s Vacuum Time

Start with the carpets and migrate to the nooks with the additional vacuum tools after that.

Run the vacuum cleaner over your carpets slowly. It’s tempting to go at full speed to get the job done more quickly, but a slow approach will ensure you pick up all of the dust. If you miss a spot or don’t clean thoroughly enough, dust will continue to fluff out of the carpet when you walk on it.

6. Check Your Air Vents

Often forgotten during a post-remodel clean, air vents are a magnet for dust.

Make sure you dust and vacuum inside your vents as well as the external grills. This will prevent any clogging in your air conditioning or heating system, and stop any dust from recirculating back into the room you’ve spent ages cleaning.

7. Wipe Hard Surfaces (and Dry Them, Too)

Wipe down any hard surfaces like kitchen counters with disinfectant to make sure your home is as clean as possible.

Prevent any musty smells or mold problems in your newly remodeled home by drying off all areas that you’ve cleaned, too. Remember to leave cupboards open to dry out, for example, otherwise you risk some less-than-pleasant damp smells.

8. Vacuum Again

When you think you’re all done, run the vacuum around the area again. A lot of the dust in the air will have settled by now, so a final clean will help to minimize the risk of ongoing dust problems.

Methods for Removing Dust:

Dust needs to be trapped rather than spread into the air or it will just land in a new location. With the high levels of dust produced during construction, it will take several cleanings to remove it all. Here are a couple of methods to get rid of dust for good.

  1. One of the first lines of defense against dust is the air filters in your home. They trap dust, but they can also add it to the air if they are not cleaned and replaced regularly. Check your air filters first and replace as needed. For more information, see How to Clean Your Homes Air Filter.
  2. If the dust is still heavy in the air, you can rent an air scrubber from a major hardware store to remove the bulk of the dust. This can be helpful while cleaning as well to remove the dust that you kick up.
  3. Wearing a face mask is important to prevent inhaling the dust. These can be purchased at a hardware store.
  4. Vacuuming is the first step for removing the dust. It will remove the most amount of dust and is the easiest to do. Put an upholstery brush on the vacuum wand. Start at the top of a room and work your way down. That means to vacuum the top of the wall first. Work in sections, moving the wand sideways across each section. (If your vacuum has a filter, be sure to monitor it and clean as needed.)
  5. If there are vents present, remove the covers and vacuum inside of the vents as thoroughly as possible.
  6. Vacuum the top ledges above window and door frames.

How Contractors Can Keep Your Home Clean During A Remodel

Remodeling can be a dusty and dirty process. Unfortunately, it’s just a part of the undertaking. When it comes to deciding to remodel and choosing a contractor, make sure you pick one that will respect the cleanliness and organization of your home.

Hang Up Plastic Walls

Often times our crew puts up plastic walls to keep the dust in the project area only.

Lay Cardboard On The Floors

Cardboard is put down to protect the floors from tools, fixtures or other items that may inadvertently fall onto the ground.

Cover Vents

Covering the intake and exhaust HVAC vents helps prevent the any dust or dirt from circulating in the house and getting into other areas of the home not being worked on.

Put On Shoe Covers

Shoe covers are sometimes necessary when hauling in equipment and products from the outside to the inside of the home to stop unwanted dirt from being tracked into the client’s house.

Watch Out For Pets

For most of us, our pets are part of your family. A remodel can be a disturbance in your pet’s usual day to day habits. Respecting pets and their needs is something we pride ourselves on.  We’ll feed them, let them out to go to the bathroom, and keep them out of harm’s way. Choose a contractor that will make sure your pets are a priority and wont’ be lost in the construction around them.

Lead Safe Work Practices

In 2010 the Environmental Protection Agency (EPA) required remodeling and construction contractors to be certified in order to remove lead-based paint from homes built prior to 1978. The contractors need to discuss lead safe practices with the homeowners before works starts. Be certain to choose an EPA certified contractor.

Clean Up Each Day

A professional contractor will clean up after themselves after each work day ensuring you don’t come home from work to a disorganized and dirty space. The last thing you want to do is spend money on a remodeling project and have to clean up after the crew that you’ve paid to keep things tidy.

POST-CONSTRUCTION CLEANING CHECKLIST

1. Vacuum Carpets & Upholstery

It’s all too easy for dust and dirt particles to embed themselves in curtains, upholstered furniture and carpeted floors. If allowed to settle after construction, the result can not only look filthy, but also cause itchy, irritating reactions for friends, family or guests. Vacuum all soft surfaces, paying close attention to the details. Remove and vacuum each furniture cushion, and the underlying frames. Try vacuuming twice if you feel any residual dust after the first round.

2. Wipe Down Hard Surfaces

Clean surfaces from the top down. Start by wiping the dust off your walls – yes, even your walls collect dust during construction. Dry dusting is the safest way to remove the particles without damaging a wall’s surface, but a damp cloth can also be used depending on your type of paint or wall covering. Refer to the paint or wallpaper manufacturer before using any moisture, and test a small area before proceeding. Moldings and cabinets are another favorite resting spot for dust particles. Take a duster to these areas next. Clean the interior shelves of all cabinets, paying special attention to those hard-to-reach corners. Wipe off countertops and any other flat surfaces before tackling the dirt and debris that’s on or near the floor. Then, sweep out any visible dust, and mop your hard floors from wall to wall.

3. Clean Air Vents & Replace Filters

In a large home renovation project means, dust and debris will mingle with the air itself, making its way to your vents. Even if you only renovated one part of your home, treating the air vents and filters in that space is critical to reduce the amount of dust that can spread through the rest of your home. Remove the vent covers from the surrounding walls and ceilings, clean each one with soap and warm water, and let them dry thoroughly. Replace any exposed air filters with fresh ones before replacing the vent covers. Breathing dusty air can lead to allergies and respiratory issues, so remember not to skip this step!

4. Don’t Forget About the Little Things

Clean any other furniture or items in the renovation zone for a fully dust-free living space. Here’s a quick list of commonly overlooked areas:

  • Ceiling fan blades
  • Light fixtures
  • Lamp shades
  • Electronics
  • Small appliances
  • Decorative items

bookmark_borderWhat Can A Pain Management Doctor Do For Me

Tips for Choosing the Right Pain Treatment Program

Coping with pain can be a difficult challenge, especially when it begins to interfere with your ability to lead a normal life. Chronic pain from an illness, injury or surgery can become both physically and psychologically debilitating, leading to a breakdown in your interpersonal relationships and your ability to perform your job and other day-to-day tasks. If youíre suffering the consequences of intense chronic pain, a pain management treatment program can put you back on track to living the life you once had.

Pain treatment programs provide various forms of treatment to help you minimize and manage your pain. These treatments include medications, therapies, mind-body techniques, counseling and physical health regimens. For those who don’t want to use prescription painkillers for fear of developing an addiction, these programs often offer holistic care and all-natural treatments. They also teach coping strategies that are equally powerful alternatives to medicate-based treatment.

What type of pain do they treat? Different types of pain are caused by different conditions, and each condition requires specific expertise. Not every pain treatment program will be equipped to properly handle your specific needs. Ask about the program’s expertise regarding your type of pain and the condition that caused it.

Do they offer comprehensive treatment? A multidisciplinary approach is the most effective way to combat chronic pain. Make sure the program provides a combination of pain treatments that include the following: group therapy, counseling, physical therapy, occupational therapy, biofeedback training, TENS units, family counseling, aftercare, etc.

Is the program inpatient or outpatient? Each person’s individual needs will determine if inpatient or outpatient care is needed. If you need to undergo detoxification from prescription painkillers, inpatient care is recommended. Otherwise, the choice between inpatient and outpatient care will be up to you and your doctorís recommendation.

How To Choose the Right Pain Specialist

With almost one in five American adults experiencing chronic pain, it is hardly surprising that there is so much demand for pain specialists.  That is, at least in part, why there are an increasing number of health care professionals who have assumed the title of “pain specialist.” Many of these pain specialists may have some medical training in the field of pain management, but this training isn’t always sufficient to qualify them as a pain medicine specialist.

The Field of Pain Medicine

The specialty of pain medicine arose relatively recently, but, of course, it has origins that go back to the creation of medicine. Pain medicine as a medical specialty started in the 1960s, followed in the 1970s with an international professional association. In 1991, the American Board of Anesthesiology created a certificate of added qualification in pain management; that same year, the American Board of Pain Medicine was established. 

Primary Care Versus Specialty Medicine

When considering the kind of medical professional to treat your chronic pain, the first choice should be between a primary care doctor or a pain specialist. In most cases, you have probably been obtaining care for your pain from your primary care physician since the onset of your pain symptoms, but you may find that a pain specialist is a better option if

Pain becomes chronic—the definition of chronic pain is any pain condition like arthritis, back pain or neuropathy that lasts longer than three months. If you reach the three-month mark without any pain relief, you should request a referral to a pain specialist.

No underlying cause—if your primary care physician can’t find a health condition that is causing the pain, you may need the advanced diagnostic skills of a pain specialist. It may be that there is a condition that your primary care physician is missing, or that the pain itself is the primary condition; in either case, you are probably more likely to find relief with a specialist.

Tips When Choosing A Pain Management Specialist

Pain in the body can be devastating. The different types of pain are caused by several reasons and, therefore, different management approaches are needed. Pain experts have enough experience to deal with all pains related to muscles and poor alignment of bones. Prizm offers the best pain management specialists in Canton, MI and you can visit their website to see more of what they offer

The expertise

Pain specialists use non-intrusive therapies to treat various pains. They perform a thorough check to the patient and come up with the best way to deal with such pains. Therefore, a high level of expertise is needed before any practitioner can start working. This includes studying the human anatomy, causes of various pains and how to solve them through different safe and natural ways. These skills help them to be accurate when dealing with pain patients who are delicate and emotionally affected. Any mistake can cause severe damage to the situation at hand.

Ability to handle different people with care

Endless pain can happen to anyone at all ages. However, the elderly people experience pains more often due to many complications which come with old age. Therefore, the pain specialist needs to have patience and excellent customer care qualities to handle the aged. Emotional support is part of healing the physical pain, and this is what the old needs. Other people also need same care when handling them since physical pain may bring an inability to move or perform tasks.

Consider facilities

With today’s technological advancement, pain relief centers have embraced state of the art equipment and medication to allow them to handle pain more accurately. Better and advanced scanners can help identify the exact cause of pain and thus treating it will be faster and with better results. Apart from equipment better medications facilitate faster healing and fewer side effects. Therefore, one must ensure that the centers they choose for pain must be well equipped

Consider location

Pain relief therapies to do not take overnight to work. Some need many sessions of treatments to have a painless body. If possible, it is better to have such a facility as near as possible. Movement, especially long journeys makes the pain worse. Therefore, consider the locality of the center you choose.

CHOOSING A PAIN MANAGEMENT TEAM

A pain management team is a group of individuals, both health professionals and others with community and education expertise, who will assist in maximizing your quality of life. This help can take the form of physical therapy, prescription of medications, cognitive therapy, education about pain and its management and support to live better with pain. The health team will likely comprise: pain medicine specialists and GPs, physiotherapists, psychologists, nurses, etc and others in your support team could be: pain support group facilitators, Pain Link guides, APMA pain management educators and each will have a different role to play in your care.

Choosing who will best fill each role can be difficult and if you are not comfortable with the way a doctor or therapist communicates with you or treats you, try to discuss this with them, and if you remain unhappy try someone else. Remember that each member of the team should be someone whom you trust and feel comfortable with, and should believe that you are in pain, considers your concerns seriously, and encourages open discussion of your problem.

General practitioner –

Your GP is usually your main health care provider and he/she will be your first point of contact. Your GP will communicate with other members of your health care team and, where appropriate, will refer you to a specialist clinician or surgeon depending on the cause of your pain.

Specialist clinicians –

Specialist clinicians involved in the management of chronic pain include Pain Specialists, Neurologists, Rheumatologists and Psychiatrists

Specialist surgeons – Specialist surgeons involved in the management of chronic pain include Neurosurgeons and Orthopaedic surgeons,

Pain and pain management

Pain is a very common condition. The occurrence of pain rises as people get older, and women are more likely to experience pain than men.

Pain may be anything from a dull ache to a sharp stab and can range from mild to extreme. You may feel pain in one part of your body or it may be widespread. Studies suggest that a person’s emotional wellbeing can impact the experience of pain. Understanding the cause and learning effective ways to cope with your pain can improve your quality of life.

How pain affects the body

Pain is a complex protective mechanism. It is an essential part of evolution that protects the body from danger and harm.  The body has pain receptors that are attached to two main types of nerves that detect danger. One nerve type relays messages quickly, causing a sharp, sudden pain. The other relays messages slowly, causing a dull, throbbing pain.

Some areas of the body have more pain receptors than others. For example, the skin has lots of receptors so it is easy to tell the exact location and type of pain. There are far fewer receptors in the gut, so it is harder to pinpoint the precise location of a stomach ache.

Managing pain without medicines

Many non-medicine treatments are available to help you manage your pain. A combination of treatments and therapies is often more effective than just one

bookmark_borderMold Inspection And Remediation

How to Pass a Home Inspection: Solve Problems First

One of the biggest roadblocks standing between you and the successful sale of your home could be the home inspection. Don’t lie awake nights worrying about what the inspector might find. Instead, conduct your own inspection, with the help of experts if you need them, and pass the inspection with flying colors. Here are some potential problem areas to investigate:

Wipe out mold and mildew

Toxic mold has gone high profile in recent years. So mold and mildew stains and odors can scare buyers away on sight. Chances are you won’t even get a reasonable offer if mold and mildew are suspected. Not all mold is toxic, but buyers don’t know that. Even if the mold in your house is the “normal” variety, find it and kill it.

Terminate the termites

You may not know that termites eat the wood from the inside out. And they can munch through quite a lot of it before you realize they are there. They don’t just feast on wood either. They have an appetite for a lot of tasty morsels around your home, including flooring, insulation, books, furniture, carpet—they have even been known to chew through swimming pool liners.

Climb up higher

The home inspector will climb up on your roof, so make sure you get there before he does. There are several things to look for. Check the fitness of the roof by looking for loose or missing shingles, and repair them if needed. Even if your roof is old, it’s considered in working condition if there are no leaks. Look for damage to the chimney, flashing or eaves. Clean out the gutters and make sure downspouts are clear and water is running away from the foundation. A simple chimney cleaning can prevent chimney fires and damage to your entire house.

Wash up

A good power washing gets rid of stains, algae, mold, mildew and moss. Pay special attention to your decks and porches. Algae and mold can make your deck slippery and dangerous. After you’ve cleaned things up, seal the deck, porch or stairs to help prevent future water damage. Bare wood soaks up water like a sponge, while sealing makes the water bead up and roll off. And your deck will look nicer, too.

How Does Mold Affect Home Sales

Selling a home with mold is not something you want to mess around with. There are buyers that will bail out of a home sale at the first mention of mold discovered in a property! Everyone is familiar with common household mold, the fungi that pop up in all kinds of moist environments. It grows on food left too long in the fridge, for instance. Unfortunately for homeowners, it also grows in attics, bathrooms, basements, and virtually any moist surface around your home.

If you see black spots developing on a wall in a poorly ventilated room, for example, you are probably noticing the beginning stages of a mold problem. Mold is all around you, generally in airborne spores, searching for an ideal place to land and develop. In small amounts, it is not a problem, but when it finds a moist place in your home and you fail to notice it, it can quickly develop into a serious problem.

When to inspect for mold

One good thing about mold- if you can see it, you have mold in your house. Seeing mold in the cracks and corners of your walls definitely means it is growing and spreading more spores. Keep in mind that mold may also grow in places you cannot see, such as in your ducts or between your walls. It may also form colonies so tiny they escape the eye. A few situations should make you look for any mold problems in your house.

  • Water damage. If your basement flooded, roof leaked, or a broken pipe sprayed water all over the kitchen, you need to inspect for mold. Any place that got wet and was not quickly dried (within 24 to 48 hours) could become contaminated by mold.
  • Purchasing a new home. There is no way to know what kind of water damage may have happened in the house you are planning to buy. The only way to find out if mold is present is to do a mold inspection.
  • After a house has been unoccupied. If a house has been closed up and unoccupied for months or years, humidity could have built up inside and caused mold to grow. This is especially a problem in warmer areas with high humidity.
  • After mold remediation. If you have gone through the often expensive and difficult steps to deal with a mold problem, regular mold inspections are a good idea to make sure you really got rid of it all.
  • You see some mold. If you notice some green, blue, black or white stuff growing in your house, do a mold inspection to make sure you find it all. It might not be restricted to one location.

What to do if you find mold in a Home Inspection

If mold is found in a home inspection, remember one simple thing – call Canada’s Restoration Services. We have years of experience and training when it comes to safe and proper mold remediation and mold removal. We are fully licensed, insured, and bonded and perform all mold remediation according to industry standards.

Whether you are the buyer or the seller, we provide the necessary report and estimate to save the sale. For a one-time Inspection Report Fee, a dedicated project manager will:

  • Inspect the property for mold growth
  • Identify the source of the mold growth
  • Provide a detailed report with pictures and findings of the situation and
  • Provide a quote on the safe mold remediation

Mold is disclosed or identified but you are not sure whether you need to hire a professional to remove it.

In many cases minor mold problems (less than about 10 square feet of mold) can easily be handled by the home owner with a free weekend afternoon and a few basic supplies from the hardware store. If your client prefers to hire a professional instead, mold remediation – when done by a professional and ethical company – should not be expensive for minor problems. Close more deals by advising your clients that minor mold problems should never be costly to fix and can often be done by the “Do It Yourselfers” in one day.

bookmark_borderSigns Your Asphalt Shingles Roof Should Be Replaced

How to Choose the Perfect Shingles for Your Roof

A new roof isn’t something you invest in every year, which is why you want to make sure that the one you choose—the shingle type, style, and colour—will be suited to your needs and preferences.

Choose the Right Type of Shingle

One of the first things you’ll have to decide is what type of shingles you want for your roof. Herb Lodde & Sons installs laminate roofing as well as cedar shakes and shingles.

If you prefer an asphalt-based shingle, it’s important to understand the differences between 3-tab and laminate shingles, two of the most popular kinds available for residential homeowners:

Regular asphalt shingles (otherwise known as “3-tab” shingles) are flat with one shingle tab shape and size. They are lighter than laminate shingles; however the prices are typically comparable and 3-tab shingles are less durable over the long run.

Architectural or laminate shingles are a type of asphalt shingle, but they’re built with a heavier base mat and a greater number of layers of more refined asphalt. The tabs have different sizes and shapes, which gives them a more dimensional appearance.

Factors to take into account include:

Appearance: How much dimension do you want your shingles to have? Architectural shingles are designed to provide a shadow effect that gives your roof an ultra-dimensional look.

Algae Defence: If you live in an algae-prone area, look for shingles that feature built-in guards against discolouration.

Fire Protection: To keep your home and everything in it safe, your shingles should have a Class A fire rating (the most effective against severe exposure)

After you know the type and style of shingle you want, it’s time to choose the colour. It sounds simple at the start, but don’t be surprised if this is the hardest part of the process:

Think about Your Home’s Aesthetics: While one type of shingle might work on a Tudor-style home, you might find that it clashes with other fashions (like Ranch or Colonial).

Don’t Forget Curb Appeal: If you might be selling your home in the next few years, going with a neutral colour for your shingles is a good way to keep your roof current. Don’t be afraid to add some flare with a more striking pallet, though, if that suits your home’s overall personality.

Survey Your Neighbourhood: Does one of your neighbours have a roof that catches your eye? Ask them what type of shingles they have and who installed them. Knowing what your neighbours have can also make it easier to figure out what unique routes you can take if you want your house to stand out.

How to Select the Best Roof Shingle

Selecting the best roof shingle can be a daunting task. There are many options involved, including shingle composition, style and colors, not to mention price. All of these factors must be weighed into making a shingle decision, and even then, there are variables within variables. Foremost to keep in mind is how long a particular type of shingle will last in your particular climate. Bottom-basement-priced shingles won’t last as long as top-grade shingles, and some types of architectural shingle patterns are more suited to a dryer climate than wet-weather patterns.

Determine the cost. Use a tape measure to measure the approximate square footage of your roof. Shingles are sold by the square, and each square will cover 100 square feet. Measure the length and width of your roof area to determine the square footage. Multiply the results together. For example, a 10- by 18-foot roof equates to 180 square feet of roofing area. Add in 10 percent to cover waste for a total of 198 square feet. You will need two squares for that project. Knowing this will allow you to calculate the cost for any type of shingle that you desire.

Decide on a warranty or how long they will last. In general, the more expensive the shingle, the longer it will last. This will vary with architectural shingles, however. Your cost will be more for these designer shingles, but they may not last as long. Warranties are only as good as the company they were made by. Stick with a known shingle manufacturer instead of some fly-by-night start-up that may guarantee you the moon but not be around long enough to honor it

Choose the type you want. Asphalt shingles are the standard of the industry and are priced accordingly. They have some of the longest warranties available and are always a good choice for durability and effectiveness.

Choose the color that you want. Shingles come in a variety of colors that will fit the decor of any home. Reds, greens, blues, whites and custom colors are available. The darker the color, the more heat will be retained on the roof. A lighter color roof makes for a cooler attic, so if you have usable attic space, a lighter color may be a better choice.

A Homeowner’s Guide to Choosing the Right Roof Shingle Type

How to Choose the Best Shingles for Your Roof

Whether your current roof is in need of replacing or you’re weighing design options as you build your dream home, choosing shingles is a big decision. There’s no shortage of options when it comes to roofing materials and styles, each with their own strengths and weaknesses.

Factors That Impact the Type of Roof Shingle You Need

How much you’ll pay for various roof shingle materials and installation is only the tip of the iceberg. There are several key factors to consider deciding on the best roofing material for your home.

How Much Do Roof Shingles Cost?

Most homeowners pay between $4,700 and $10,460 for a new roof. When budgeting, keep in mind that the cost of installation and labor, as well as the cost of the material itself, will impact your bottom line. You’ll also need to account for the total square footage that your new shingles will cover. If you have a large roof area to cover, you might consider opting for cheaper materials.

What Is the Slope and Pitch of Your Roof?

Slope refers to how steep the angle of your roof is, and is normally measured with two numbers representing the rise, or height of your roof, and the run, representing it’s length. As an example, a slope of 4:12 indicates that a roof rises four feet and runs 12 feet. Depending on how steep the slope of your roof is, it may not be well suited for heavier roof shingle types, such as slate or clay tiles.

What Are the Weight Limits of Your Structure?

The weights of shingle materials vary widely. That’s why it’s important to know how much weight your home’s structure can safely support before making a decision. Buildings are designated a “dead load” tolerance, or the weight of the roof structure. If the dead load is exceeded, the structure will not be able to support its own weight. The average home has a dead load of around 15 pounds per square foot.

How to Choose High-Quality Asphalt Roof Shingles

A new asphalt shingle roof is a significant investment. To get the most bang for the buck, you’ll want to consider the quality of shingles, the knowledge and skill level of the roofers you intend to hire, and also a few preventative maintenance guidelines. When high-quality asphalt roof shingles are correctly installed and well maintained, they can last for decades.

Fiberglass Shingles – Fiberglass shingles are made from a woven fiberglass mat coated with top-and-bottom layers of asphalt and topped with ceramic granules. Since these shingles have a higher fire rating (typically Class A, while organic shingles only garner B or C) and are more durable than their organic counterparts, they come with extended warranty. Additionally, today’s manufacturers make available Energy Star certified fiberglass shingles, which keep buildings cooler and reduce air-conditioning costs.

Organic Shingles – Traditionally consisting of cellulose fiber (e.g. recycled waste paper or wood) saturated with asphalt, organic shingles are coated with a mixture of asphalt and mineral fillers. Compared to fiberglass shingles, organic shingles are costlier, heavier, thicker, and less environmentally friendly due to the high asphalt content. Because these shingles absorb more water than fiberglass shingles, they deform more as they age.

Choose the Right Style

One thing good about asphalt roof shingles is that they are made so many colours and styles some even look like other types of roofing materials. Before opting for a particular style

Three-tab Shingles – Considered the standard-bearer of asphalt shingles, three-tab shingles are manufactured in a single layer. Since these shingles are thinner, flatter and less durable than the architectural shingles described below, they carry shorter warranty periods.

How to choose roofing shingles

Your budget

Your roof may be one of the largest investments you make in your home, and with so many types and styles, you can find shingles that fit a range of budgets.

Curb appeal

Roofs are a key and often-underestimated part of a home’s look. They can represent up to 40% of curb appeal, so it’s important to consider style and color.

Style

Our shingles fit with both current and historical home designs. Looking for a roof that works well with your home and complements what’s in your community? Start by looking at similar homes in your neighborhood and take note of their roofing shingles. Contractors can help you identify the products.

Ongoing Protection

Using high-quality shingles is the first part of protecting your roofing investment. We offers a variety of warranties so you can choose the right level of coverage for your project.

Types of Asphalt Shingles

Asphalt are the most popular shingles in the U.S. because they’re affordable to buy, install, and maintain. They are made from a sturdy fiberglass base, coated with waterproof asphalt and tiny granules of ceramic-coated mineral.

bookmark_borderSpeed Dome Cameras And Their Camera Operator

Tips for Shooting Live Stage Events

Thinking about shooting a live event? Here are 14 things you need to remember.

For videographers, a live event can be an exhilarating experience that pushes you outside of your creative comfort bubble… but if you’re not careful, a seemingly insignificant technical error can ruin the entire video. Don’t let this happen to you! Here are 14 tips for shooting your next big live event.

Pick a Style

Before you shoot a live stage event, do some research into what you want the look and feel of your video to be like.

TED-itional Tripod

While they may be the most popular lecture series in the world, TED talks are surprisingly simple when it comes to shooting style. Most TED talks consist of a few cameras on tripods with a master camera. It’s all pretty stationary, which is not a bad thing.

Mixed Shoot

Most modern live events consist of a mixture of tripods, shoulder rigs, cranes, and sliders. These events can become incredibly complicated to edit in post (or direct live). But when done well, a mixed-camera shoot can bring a lot of life to an otherwise boring event.

Cinematic Highlight Video

Sometimes your client will only want a “highlight reel” of the live event and not the entire event itself. This is your opportunity as videographer/filmmaker to show off your cinematography skills. Good event highlight videos will feature complex movements. It’s also more common to see highlight videos shot on DSLRs instead of more traditional video cameras.

Multi-Camera Direction Tips for Properly Shooting Live Events

Running a multi-camera shoot at a large outdoor event can be tricky. Here are a few tips to keep the operation running smoothly.

So you make it to your nearest arena to see your favorite band. Great, except the talent themselves are the size of ants. This is where Image Magnification (or more widely known as IMAG) comes in. IMAG is now a staple for almost all large-scale concerts. In this article I’ll go over a few important tips of the trade for anyone getting ready to throw on a headset, hunker down behind a switcher, and direct a multi-camera show for a live concert.

You can always hide an army of robotic cameras around the stage to get specific shots. However, the majority of your show will come down to hiring two or three camera operators. Your first camera should always have the longest lens available, and it should sit on a tripod — dead center — inside front of house. The sole purpose of this camera is to follow the most important person on stage, which is usually the lead singer (if the band is not instrumental). The long lens camera should stay somewhere around the waist up, tight on the talent, following them wherever they may bounce to on stage. This camera can also do some long pulls or pushes, to/from the stage, but 99 percent of the time their job is to solely stick to the lead talent in the band.

If you only have two camera operators, the best placement for the next operator is on the downstage edge in the pit, directly in front of the stage. This camera’s purpose is to capture all of the action happening on stage. If a guitarist shreds a lead break or the drummer busts into a solo, this camera needs to immediately focus on that musician to capture these glorious moments.

If there is a third camera operator on the show, you can either put them in the pit for more coverage of the stage, or have them on stage with the band. (Note: you must first get permission from the stage/production manager, if you choose this route.) This camera position allows for some interesting angles that even the guests in the nicest seats would never see, allowing the camera the unique opportunity to become part of the production. This usually happens between songs, when the musicians decide to have a conversation with the camera. Not only does this lend the audience the illusion that, through the screens, they are having a personal moment with the musicians, but it also magnifies the visual aspects of the show for those in the nose-bleeds, while including them in the live experience.

As is true with editing video across most media, the two most-used transitions in your arsenal are the straight cut and the dissolve. If your camera operators are lacking video return, make sure to let them know if they have matching or similar shots. You need to avoid this on a straight cut, but especially on a dissolve because it creates the effect that the two matching images are melting together into an amorphous blob mid-transition, which, when displayed on massive screens, can be quite unpleasant.

Hiring an Event Videographer: How to Contract the Best Pro for Every Event

Videography is a lot like photography and other creative pursuits; everyone dabbles in it, but not everyone does it well. If you need to capture high-quality video of your next, a professional event videographer is worth the investment. Read on to discover the benefits of hiring a videographer rather than managing this essential task yourself, and learn what to look for in a pro event videographer

What is event videography?

Event videography is the process of recording a live-action event on digital media. Videography is similar to cinematography (the movie-making process), but it occurs outside of the motion picture production field.

The person who operates the camera is called a videographer. The videographer records footage of the event and edits the final product to produce a high-quality, engagement video segment. For social events, such as weddings, the video is shared with the couple and guests. For business or educational events, the video is used for websites, social media marketing, or online streaming videos

Do you need a professional videographer for your event?

You may think an event team member can capture ‘good-enough’ footage of the event on a smartphone. Or, you feel the event doesn’t merit the cost of a professional videographer.

But high-quality video documentation of corporate events, galas, speeches, and company parties is a great way to build your brand awareness and get people interested in what you do. If you plan to show your videos on YouTube (watched by 73 percent of adults in the US) or another social media platform, hiring a videographer is a must. These industry professionals produce polished, in-focus results that are well-framed, accurate representations of the event.

A Camera Operator’s Point Plan: Preparing for Live Streaming an Event

Clean Cut Media camera operator Jack Ross shares his 5 point plan about how he prepares for a live streaming event.

Speak to the Pre Production team: It is important to plan ahead so you can be prepared for any scenario that can arise when on site. The pre production team will have all the insights you need when planning what kit and equipment to take to the live streaming event as well as formulating a camera plan

Identify and source any specialised kit: Every live stream is unique and requires thought as to what equipment is required to best suit each job. We have various specialised equipment such as gimbles, sliders and backdrops. Clean Cut Media owns a range of the latest kit but occasionally, something unusual is called for, such as in this instance filming a fast paced racing event for Avon Tyres at Castle Combe Racecourse.

Prep and check: This includes making sure everything is fully charged and in working order before the shoot. This is part of your final checklist to ensure you have enough batteries, cards, microphones etc… as well as cleaning all camera sensors and lenses, especially if they have returned from a clay tournament.

Use protection: Our kit is flown all over the world and can often take a few knocks in transit. It is important to use the best possible cases and rucksacks to ensure your valuable kit is protected at all times. We use Pelican cases with laser cut foam inserts as well as Lowepro backpacks and Litepanels lighting cases to maintain the high quality of equipment we have.

Random Tips from a Professional Camera Operator

Teaching the craft of camera operating is extremely difficult to do well, so I’m going to do it half-assed and give you some random tips that may help you along in your career

My childhood dream was to be a camera operator. I wanted to be the person looking through the camera and framing a shot. While I would have enjoyed having a long career as an operator, I entered the business at a time when operators were a dying breed, and the only people guaranteed careers as operators were Steadicam operators. I wasn’t particularly interested in doing that, so I moved towards being a director of photography faster than I had expected. Most of the shoots I do don’t require, or won’t hire, an operator, so in a way I’m still a career operator. I just get to light the shots as well as operate them.

No one taught me how to be an operator. At a young age I found myself drawn to strong compositions in certain TV shows and movies, and I sought to emulate those compositions with my Regular 8mm film camera. Over time I learned, through trial and error and the occasional tip from those more experienced than I, how to move the camera predictably and repeatedly.

LEARN THE GEARED HEAD

I really enjoy working with geared heads, although I rarely get to use them anymore. Most of my projects can’t afford to rent one for me. Hopefully this will change with the advent of the Gearnex geared head, which I’ve now used on several shoots

The geared head offers an incredible amount of control over camera moves, especially dolly moves. For some reason it’s very easy to match pan and tilt speeds to a dolly move by spinning wheels rather than moving a pan handle around. The wheels also offer a wide range of possibilities from very subtle adjustments to aggressive camera moves that stop on a dime.